TAST tool Menu
TAST Adaptors
Adaptors examples
TAST Integrations
Interesting features
Documentation of technical administration
Modeling recommendations
Training in the TAST tool
TAST tool Menu
TAST Adaptors
Adaptors examples
TAST Integrations
Interesting features
Documentation of technical administration
Modeling recommendations
Training in the TAST tool
This option of the TAST tool allows the user to execute the Test Sets. Also, it allows to create new Test Sets to be executed.
The RUNNING option has two tabs:
With this option the Test Sets corresponding to a specific diagram can be managed. Here in Test Set Management are two different “tabs”:

It shows the list of Test Sets of a specific domain and project, with information about its status, as well as its Test Case Datasets.
In general, it can be filtered by:
It will also allow creating, editing and deleting a folder.
In the main window of MANAGEMENT OF TEST SETS, the list of Test Case Sets for the filters used will be displayed, with the following information:
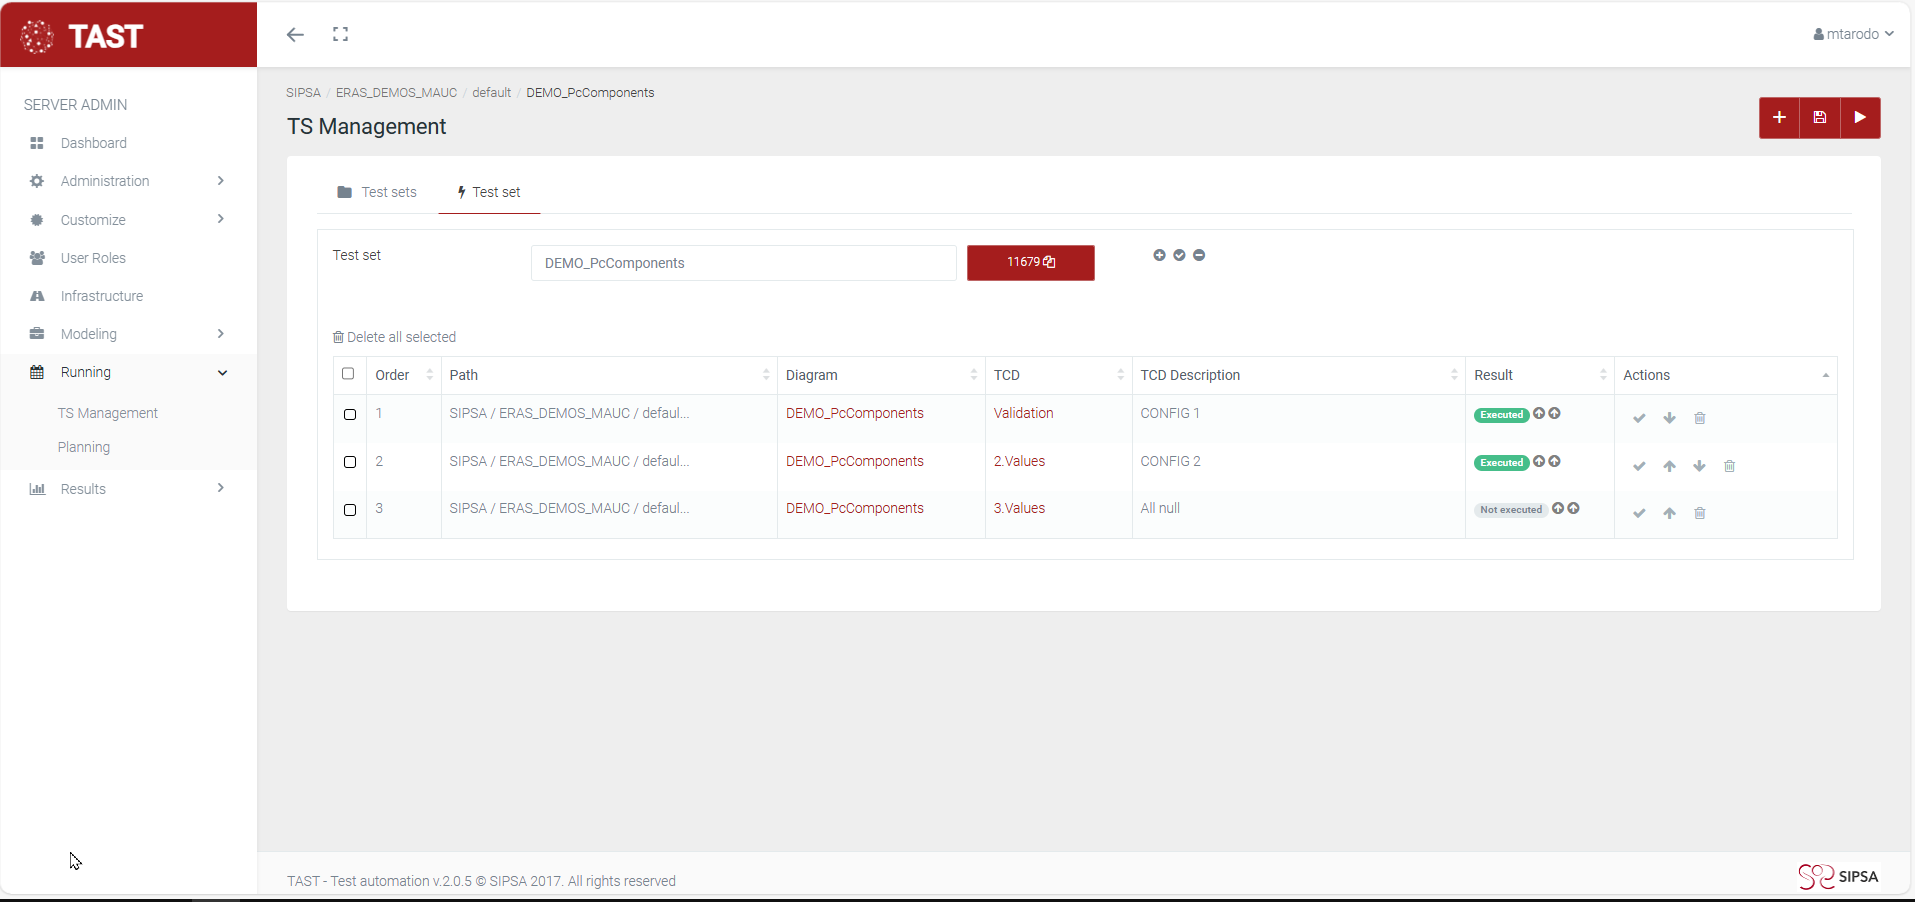
It is accessed by clicking on any Test Set in the Test Sets window.
In this window you can perform actions on the Test Sets, as well as manage the Test Case Data associated with the Test Set:
The list of all the Test Case Data corresponding to the Test Set on which it has been previously clicked will be displayed, with the following information:

To include Test Case Data in the Test Set, press button ”+” at the right of the Test Set name. A new window will open and will allow to select the Diagram, so that all available and selectable Test Case Data will be shown in the left-hand list.
The objective is to provide Tast Client application with the ability to launch the execution of a Test Case Validation (TCV from now on) in debug mode. In this way, the user will be able to run a TCV step by step until the end, or to stop at the steps that are considered appropriate.
On the other hand, the user will be able to stop the execution in debug mode of a TCV at any time and switch to normal execution.
At all times, the debug execution results will be available, showing the steps that have been executed in a log.
Also you can debug more than one test at a time.
For this purpose, two new columns “Step” and “Debug” are enabled on the Tast Client, to control the debugging execution of the TCVs as shown at the image below.

From the Debug column, the user will be able to tart/continue, or stop the debug execution of a TCV.
The Step column will show the evolution of the TCV debug mode execution, and it also allows the user to enter, if desired, the step to which he wants to go forward.
Once the execution in debug mode has started, the Step field will always show the last step executed, as well as information related to it.
We will see all of this below in more detail, where the operations will be explained.
1. Starting a TCV execution in debug mode
Before running a TCV in debug mode, we will see that the value of the Step field initially is “_._”. This will indicate that the execution in debug mode has not yet started.
To start the debug execution of a TCV, we will have to press the button “Run to next step” below the Debug column.
There will be 2 ways to start the debug execution:


2. Continue the execution of a TCV in debug mode
Once the debug execution of a TCV has started, there will be several ways to continue with it.


3. Stopping the debug execution of a TCV
At any time the user will be able to stop the execution of a TCV in debug mode, by pressing the Stop debugging button in the Debug column.

Reasons why the user may want to stop the execution:
1. Either because you have already checked the parts of the diagram that you wanted to check, so you conclude the debug execution.
or
2. When you need to make changes to the diagram, so you will need to stop the execution and restart it later in order than the application can update the TCV.
4. Step field notation
In the Step field the user will be able to see the current step or enter the step number he wants to advance.
The notation of the steps in this field is practically the same as the one we currently see in logs.
Step_= step_main.step_gate1.step_gate2 ….
Where each point means a gate deep.
For example, if we wanted to advance to step 11 of the main diagram, we could type 11 or 11.0, due to it would not be necessary to use the point at the first level (main diagram).
However, if we wanted to go to a certain step inside a gate, then we would need to use points.
For example, if we see (or type) this in the step field:

It would mean that current step is (or if the user has typed it, he wants to advance to):
Step 10 of the main diagram (in this example, step 10 would be a Gate, e.g. gate1), and within gate1 to its step 5 (in this example step 5 of gate1 is another nested gate, e.g. gate2),and finally to the step 1 inside gate2.
5. Other considerations
At any time during the execution, the user will be able to review the results through the Log file, where the steps that are being executed will be gradually reflected. As always, you can press the Log button in the Logs column to access to the log file of that TCV.

The result of executing any step will be reflected in the Status column (with the usual Executed -green- or Erroneous-red- statuses).

Placing the mouse over the Current Step field, the application will show a tooltip with information about that step, such as the step number as it appears in the logs and the name of the executed function.

Once the debug execution of a TCV has started, the Results uploading will be automatically disabled for obvious reasons. The user can enable it again when the debug execution ends, or when he wants to run the normal execution mode.

6. Console in Tast Client Debug Mode
Once a debug execution has started with any diagram, you can open a console window to see the execution results in real time.
To do this, when you start a debug execution, you can press the log button at the right side, to open the console window for this execution.

Then a modeless window is shown, like below. As the diagram runs you can see the execution results on it. A scroll bar will appear when it will be necessary, and you can use even a small contextual menu (pressing right mouse button) for example to select or copy some content to pasteboard.

It is also possible to show as many consoles as you need, one for each test run you are currently executing in debug mode.
Once the debug mode run stops, the console window automatically closes, returning the log button back to its usual behavior.
In TAST it is possible to schedule the Test Sets to be executed later. These plannings can be periodic.
The PLANNING option has two tabs:
In this Running option, you can see a calendar with the status of the existing plans for a Domain, Project, and, optionally, for a Specific Server:

Below the meaning of the colored circles that appear in calendar days:
 number of plannings requested. This is the initial status, when a planning is created
 number of plannings confirmed. The planning is put confirmed when the user clicks the Confirm button that appears when editing the planned Test Set (tab Plan List)
 number of plannings rejected. The user has the option to reject the planning for different reasons (clicking the Reject button that appears when editing the planned Test Set (tab Plan List)
 number of plannings executed. This status appears once the planning has been executed.
The steps to follow until the execution of the planned test cases are:
Once the Test Set has been executed, the result of the execution will be shown in the table of Results.
If the Test Set has not been executed, it will be canceled.
| Situation | Probable causes | Corrective actions |
|---|---|---|
| The planned Test Set has not been executed | The server was not available | - Check the server is in the list - Check the PC client is active in the server - Check the Test Set is programmed for that server |
